


EZR32LG330F256R60G
Proprietary EZR32LG330 Sub-GHz Wireless MCPs
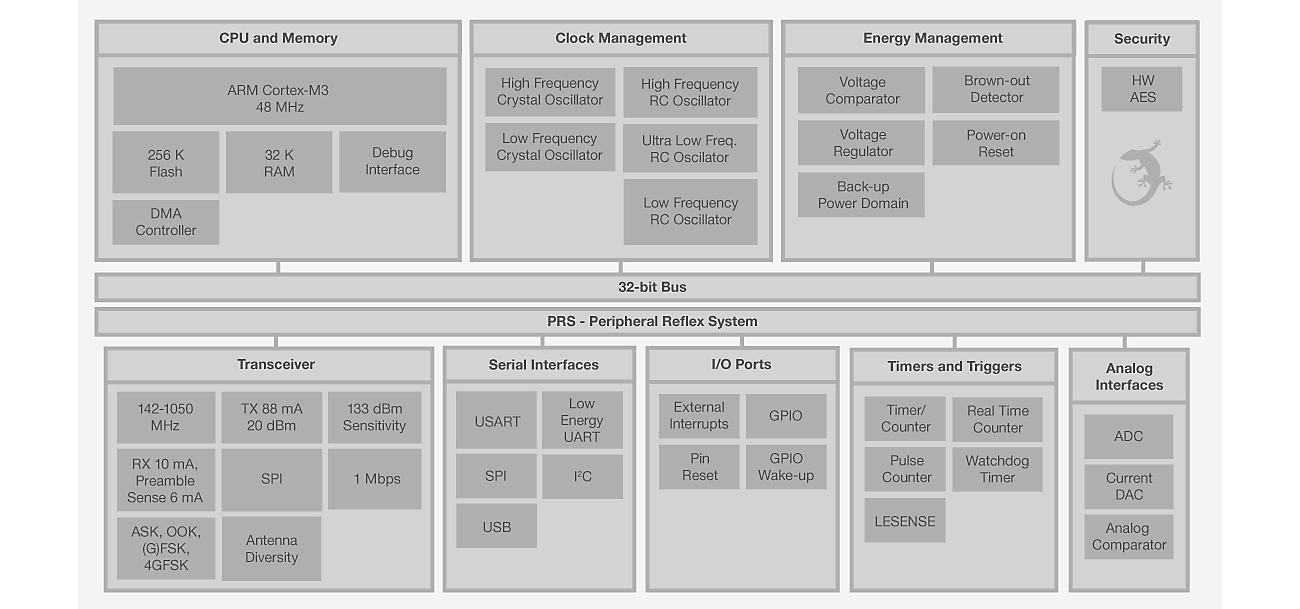
EZR32LG330F256R60G EZR32 sub-GHz wireless microcontrollers (MCUs) are targeted at proprietary wireless applications for secure, connected wireless devices. Combining a high-performance sub-GHz EZRadio/EZRadioPRO transceiver with an ARM-Cortex -M3 based MCU, it provides a 13 dBm output power and an industry-leading receive sensitivity of -126 dBm. The ultra-low power sleep modes and fast wake up time of our energy-friendly 32-bit MCUs, combined with the low transmit and receive power consumption of the the sub-GHz radio, result in a solution optimized for battery powered applications. This device includes 256 kB Flash, 32 kB RAM, 38 GPIO Pins, 4 x 16-bit timers and multiple communication interfaces.
SPECS
TECH DOCS
SOFTWARE & TOOLS
QUALITY & PACKAGING
COMMUNITY & SUPPORT
SPECS
TECH DOCS
- Application Notes (79)
- Data Sheets (1)
- Errata (1)
- Guides & Manuals (6)
- PCNs (8)
- Release Notes (88)
- White Papers (13)
- AN627: Si4x6x and EZR32 Low-Power PA Matchingv0.57/3/2020
- AN633: Programming Guide for EZRadioPRO® Si4x6x Devicesv0.94/12/2022
- AN643: Si446x/Si4362 RX LNA Matchingv0.47/3/2020
- AN904: Performance of Si4455/Si4460 RFICs at 434 MHz with Johanson 0433BM41A0019 IPDv0.17/2/2020
- EZRadioPRO API Rev C2A-A2Av2.0.59/14/2020
- AN626: Packet Handler Operation for Si446x RFICsv0.22/5/2020
- AN647: Si446x and ARIB STD--T108 Compliance at 920 MHzv0.57/3/2020
- AN656: Using NEC BJT(NESG270034 and NESG250134) Power Amplifier with Si446xv0.27/3/2020
- AN658: Si446x and ARIB STD-T67 Compliance at 426-429 MHzv0.37/3/2020
- AN736: Si446x ETSI Category 1 Rx Setup Guidelinesv0.22/5/2020
- AN790: Image Rejection and IQ Calibrationv0.12/5/2020
- AN805: Si446x Wireless MBUS Receiverv0.39/18/2020
- AN818: Si4x6x TX RF Performance and ETSI Compliance Test Resultsv0.37/3/2020
- AN866: Si446x and FCC Part 90 Compliance at 450-470 MHzv0.32/21/2020
- AN873: Si446x and FCC Part 15.247 Digital Transmission System Compliance at 902-928 MHzv0.27/3/2020
- AN882: Antenna Diversity with Si4x6xv0.17/3/2020
- AN0002.0: EFM32 and EZR32 Wireless MCU Series 0 Hardware Design Considerationsv1.57/2/2020
- AN0002.0: EFM32 および EZR32 Wireless MCU シリーズ 0 ハードウェア設計上 の考慮事項v1.57/16/2020
- AN0002.0: EFM32 和 EZR32 无线 MCU 系 列 0 硬件设计注意事项v1.57/16/2020
- AN0016.0: Oscillator Design Considerationsv1.307/2/2020
- AN1005: EZR32 Layout Design Guidev0.17/2/2020
- AN785: Crystal Selection Guide for the Si4x6x RF ICsv1.37/3/2020
- AN1160: Project Collaboration with Simplicity Studiov0.29/1/2022
- AN768: Antenna Selection Guide for the 868 MHz EZRadio and EZRadioPRO Designsv0.27/3/2020
- AN782: 868 MHz Antenna Matrix (WES0030-01-AMS868-01) Measurement Reportsv0.17/3/2020
- AN847: 915 MHz Single-ended Antenna Matrix Selection Guidev1.17/3/2020
- AN848: 915 MHz Single-ended Antenna Matrix Measurement Reportsv1.07/3/2020
- AN849: 434 MHz Single-Ended Antenna Matrix Selection Guidev1.17/3/2020
- AN850: 434 MHz Single-ended Antenna Matrix Measurement Reportsv1.07/3/2020
- AN853: Single-ended Antenna Matrix Design Guidev0.17/3/2020
- AN0003: UART Bootloaderv1.773/24/2022
- AN0003:UART ブートローダv1.776/24/2022
- AN0003:UART 引导装载程序v1.776/24/2022
- AN0004.0: EFM32 Series 0 and EZR32 Wireless MCU Clock Management Unit (CMU)v1.109/8/2021
- AN0006: EFM32 Tickless Calendar with Temperature Compensationv2.056/30/2020
- AN0007.0: MCU and Wireless MCU Energy Modesv1.109/8/2021
- AN0008: USART - Synchronous Mode (SPI)v1.139/8/2021
- AN0009.0: Getting Started with EFM32 and EZR32 Series 0v1.221/26/2021
- AN0011: I2C Master and Slave Operationv1.069/8/2021
- AN0012: General Purpose Input Outputv2.048/21/2023
- AN0014: EFM32 Timersv1.109/8/2020
- AN0015.0: EFM32 and EZR32 Wireless MCU Series 0 Watchdogv1.489/8/2021
- AN0019: EEPROM Emulationv1.099/8/2021
- AN0021: Analog to Digital Converterv1.119/10/2021
- AN0025: Peripheral Reflex System (PRS)v1.089/8/2021
- AN0026.0: EFM32 and EZR32 Wireless MCU Series 0 Low Energy Timerv1.089/8/2021
- AN0028: Low Energy Sensor Interface - Capacitive Sensev2.1.09/8/2021
- AN0028:低能耗传感器接口 — 电容感应v2.109/8/2021
- AN0029: Low Energy Sensor Interface - Inductive Sensev1.069/8/2021
- AN0030: FAT on SD Cardv1.079/8/2021
- AN0031: Making Prototyping Boards for the EFM32 Kitsv1.019/8/2021
- AN0032: Ethernetv1.089/8/2021
- AN0033: AES Cipher Modes with EFM32v1.119/8/2021
- AN0036: Low Energy Sensor Interface - Resistive Sensev1.069/8/2021
- AN0039: Interrupt Handlingv1.049/8/2021
- AN0041: Backup Power Domainv1.269/8/2021
- AN0042: USB/UART Bootloaderv1.228/14/2020
- AN0043: Debug and Tracev1.039/8/2021
- AN0045: USART/UART - Asynchronous Modev1.039/8/2021
- AN0052: USB MSD Host Bootloaderv1.039/8/2021
- AN0054: Connect the EFM32 with a Smart Phone through the Audio Jackv1.049/10/2021
- AN0059.0: UART Flow Controlv1.037/23/2020
- AN0061: Using EFM32 in Energy Harvesting Applicationsv1.029/8/2021
- AN0062: Programming Internal Flash Over the Serial Wire Debug Interfacev1.029/8/2021
- AN0065: EFM32 as USB Devicev1.039/8/2021
- AN0822: Simplicity Studio™ User's Guidev0.612/1/2023
- AN0918.0: MCU Series 0 to EFM32JGxx/PGxx Compatibility and Migration Guidev1.038/17/2020
- AN0955: CRYPTOv0.19/1/2022
- AN1004: RF Evaluation with EZR32v0.12/5/2020
- AN1011: Standalone Programmer via the SWD Interfacev0.19/10/2021
- AN1112: Helix MP3 Decoder on Series 1 EFM32 MCU Devicesv0.19/10/2021
- AN1115: Configuring Peripherals for 32-Bit Devices using Hardware Configuratorv0.96/8/2022
- AN1121: Headless Builds with Simplicity Studio v4v0.15/17/2022
- AN1187: EFP01 Design Considerationsv0.89/1/2022
- AN1188: EFP01 Coulomb Countingv0.312/15/2021
- AN1245: EFP01 Configuration Tool Guidev1.19/1/2022
- AN734: Si446x AFC Operationv0.22/4/2020
- AN888: EZR32 Quick Start Guidev0.42/5/2020
- AN895: IEC 61000-4-2 ESD System Level Protectionv0.33/25/2021
- EZR32LG330 Data Sheetv2.23/21/2024
- EZR32LG Erratav1.409/9/2021
- Wireless M-Bus Quick Start Guide v22/3/2020
- BRD4502A Reference Manual v1.104/24/2020
- EZR32LG Reference Manual v0.904/2/2020
- UG195: EZR32LG 868 MHz 13 dBm Radio Board User's Guide v2.0110/15/2024
- Wi-SUN Stack API v2.3.012/16/2024
- Z-Wave API Reference v7.23.012/16/2024
- 190211473 Updated Errata for EZR32 Leopard Gecko9/9/2021
- 191118666 EZR32LG and EZR32WG Revision C PRCN and Datasheet Update11/18/2019
- 200602790 Purchase Info Standalone WSTK Mainboard (BRD4001A) Changed to SLWMB4001A6/2/2020
- 2103301016 Errata Update v1.50 for EFM32LG/WG/TG, v9/9/2021
- 2110201128-New-Universal-Inner-and-Intermediate-Label-for-IC-Packages10/20/2021
- 2403201503 New Universal Outer Box and 3S Shipping Labels3/20/2024
- 2403201525 End of Life Notification for most of the EZR32xx OPNs3/20/2024
- 2406191539 New Universal Inner and Intermediate Label for IC and SiP Packages6/19/2024
- 32-bit MCU SDK 5.9.3.0 GAv5.9.3.05/27/2020
- Gecko Platform Release Notesv2.7.3.07/20/2020
- Gecko Platform Release Notesv2.6.2.07/20/2020
- Gecko Platform Release Notesv2.6.3.07/20/2020
- Gecko Platform Release Notesv2.7.0.07/20/2020
- Gecko Platform Release Notesv2.6.17/20/2020
- Gecko Platform Release Notesv2.7.2.07/20/2020
- HomeKit SDK Release Notesv1.4.0.012/15/2022
- MCU_SDK_Release_Notesv5.9.1.05/27/2020
- MCU_SDK_Release_Notesv5.9.0.05/27/2020
- MCU_SDK_Release_Notesv5.9.2.05/27/2020
- Connect Release Notesv4.0.0.012/13/2024
- Connect Release Notesv4.0.1.02/6/2025
- Proprietary Flex Release Notesv3.4.3.010/19/2022
- Proprietary Flex Release Notesv3.5.4.08/17/2023
- Proprietary Flex Release Notesv3.8.0.06/6/2024
- Proprietary Flex Release Notesv2.18.1.02/6/2025
- Proprietary Flex Release Notesv3.2.9.010/25/2023
- Proprietary Flex Release Notesv3.0.2.010/9/2020
- Proprietary Flex Release Notesv3.1.0.012/9/2020
- Proprietary Flex Release Notesv3.6.1.07/27/2023
- Proprietary Flex Release Notesv3.0.1.010/1/2020
- Proprietary Flex Release Notesv3.4.5.06/28/2023
- Proprietary Flex Release Notesv3.7.4.08/12/2024
- Proprietary Flex Release Notesv3.3.1.01/28/2022
- Proprietary Flex Release Notesv3.3.2.03/10/2022
- Proprietary Flex Release Notesv3.7.0.012/13/2023
- Proprietary Flex Release Notesv3.7.5.010/22/2024
- Proprietary Flex Release Notesv3.4.6.09/14/2023
- Proprietary Flex Release Notesv3.4.1.08/16/2022
- Proprietary Flex Release Notesv3.4.2.09/28/2022
- Proprietary Flex Release Notesv3.8.2.09/17/2024
- Proprietary Flex Release Notesv3.7.6.02/26/2025
- Proprietary Flex Release Notesv3.8.1.07/24/2024
- Proprietary Flex Release Notesv3.6.0.06/8/2023
- Proprietary Flex Release Notesv3.5.7.01/13/2025
- Proprietary Flex Release Notesv3.6.3.03/13/2024
- Proprietary Flex Release Notesv3.4.4.01/19/2023
- Proprietary Flex Release Notesv3.3.0.012/15/2021
- Proprietary Flex Release Notesv3.5.1.02/1/2023
- Proprietary Flex Release Notesv3.7.1.02/14/2024
- Proprietary Flex Release Notesv3.5.0.012/15/2022
- Proprietary Flex Release Notesv3.4.0.06/8/2022
- Proprietary Flex Release Notesv3.6.2.010/9/2023
- Proprietary Flex Release Notesv3.2.8.09/5/2023
- Proprietary Flex Release Notesv3.5.5.01/24/2024
- Proprietary Flex Release Notesv3.2.7.07/13/2023
- Proprietary Flex Release Notesv3.5.2.03/10/2023
- Proprietary Flex Release Notesv3.7.2.04/10/2024
- Proprietary Flex Release Notesv2.7.12.09/21/2023
- Proprietary Flex Release Notesv3.7.3.05/3/2024
- Proprietary Flex Release Notesv2.7.8.010/29/2020
- Proprietary Flex Release Notes 3.2.2.0v3.2.2.09/10/2021
- Proprietary Flex SDK 3.2.3.0 GA Release Notesv3.2.3.010/13/2021
- Proprietary RAIL Release Notesv2.18.0.012/13/2024
- USB Stack Release Notesv1.1.0.012/15/2022
- USB Stack Release Notesv1.4.1.02/6/2025
- USB Stack Release Notesv1.4.0.012/13/2024
- USB Stack Release Notesv1.2.3.08/12/2024
- Wi-SUN Release Notesv1.2.1.01/28/2022
- Wi-SUN Release Notesv1.5.2.05/3/2023
- Wi-SUN Release Notesv1.3.2.09/28/2022
- Wi-SUN SDK 1.1.2.0 GA Release Notesv1.1.2.010/13/2021
- Wi-SUN SDK 1.5.1.0 GA Release Notesv1.5.1.03/10/2023
- Wi-SUN SDK Release Notesv1.10.0.04/10/2024
- Wi-SUN SDK Release Notesv1.10.1.05/3/2024
- Wi-SUN SDK Release Notesv1.3.1.08/16/2022
- Wi-SUN SDK Release Notesv1.7.1.010/9/2023
- Wi-SUN SDK Release Notesv1.3.0.06/8/2022
- Wi-SUN SDK Release Notesv2.0.0.06/6/2024
- Wi-SUN SDK Release Notesv1.6.0.06/8/2023
- Wi-SUN SDK Release Notesv1.9.0.02/14/2024
- Wi-SUN SDK Release Notesv1.2.3.03/10/2022
- Wi-SUN SDK Release Notesv1.10.3.010/22/2024
- Wi-SUN SDK Release Notesv1.7.0.07/27/2023
- Wi-SUN SDK Release Notesv1.8.0.012/13/2023
- Wi-SUN SDK Release Notesv1.5.0.02/1/2023
- Wi-SUN SDK Release Notesv2.2.0.09/17/2024
- Wi-SUN SDK Release Notesv1.10.4.02/26/2025
- Wi-SUN SDK Release Notesv2.1.0.07/24/2024
- Wi-SUN SDK Release Notesv2.3.0.012/13/2024
- Wi-SUN SDK Release Notesv1.7.2.03/13/2024
- Wi-SUN SDK Release Notesv1.2.0.012/15/2021
- Wi-SUN SDK Release Notesv1.1.0.07/21/2021
- Wi-SUN SDK Release Notesv1.10.2.08/12/2024
- Wi-SUN SDK Release Notesv2.4.0.02/6/2025
- Wi-SUN SDK Release Notesv1.3.3.010/19/2022
- Wi-SUN SDK Release Notes 1.1.1.0v1.1.1.09/10/2021
- Sub-GHz Wireless Design Choices for Smart Metering1/22/2021
- Designing Sensors into Battery-Powered IoT Nodes9/30/2024
- Internet of Things System Design with Integrated Wireless MCUs2/6/2020
- Maximizing Range and Battery Life in Low-Cost Wireless Networksv1.02/6/2020
- The benefits and trends of sub-GHz wireless IC systems among various industry applications2/6/2020
- Using Antenna Diversity to Create Highly Robust Radio Links2/6/2020
- Add Wireless Connectivity to an LED Lightbulb10/10/2023
- Battery Life in Connected Wireless IoT Devices9/28/2023
- Enhancing Smart Lighting with 802.15.4 Connectivity10/10/2023
- Reed Switch Low-power Switch Detection Code Example5/2/2023
- Security Tradeoffs and Commissioning Methods for Wireless IoT Protocols9/30/2024
- Selecting the Appropriate Wireless Mesh Network Technology9/28/2023
- Six Hidden Costs in a Wireless SoC Design10/10/2023
SOFTWARE & TOOLS
- AN1121: Headless Builds with Simplicity Studio v4v0.18/17/2020
- AN0002: Hardware Design Considerationsv1.466/24/2020
- AN0003: UART Bootloaderv1.773/24/2022
- AN0004.0: EFM32 Series 0 and EZR32 Wireless MCU Clock Management Unit (CMU)v1.127/23/2020
- AN0005: Real-Time Countersv1.098/14/2020
- AN0007.0: MCU and Wireless MCU Energy Modesv1.117/23/2020
- AN0008: USART - Synchronous Mode (SPI)v1.139/9/2021
- AN0009.0: Getting Started with EFM32 and EZR32 Series 0v1.238/17/2020
- AN0012: General Purpose Input Output (GPIO)v2.018/14/2020
- AN0013: Direct Memory Accessv2.059/9/2021
- AN0014: Timerv1.109/10/2021
- AN0015.0: EFM32 and EZR32 Wireless MCU Series 0 Watchdogv1.106/30/2020
- AN0017: Low Energy UARTv1.089/9/2021
- AN0018.0: Supply Voltage Monitoringv1.108/17/2020
- AN0020: Analog Comparatorv1.089/9/2021
- AN0021: Analog to Digital Converterv1.118/14/2020
- AN0022: Digital to Analog Converterv1.109/9/2021
- AN0024: Pulse Counterv1.079/9/2021
- AN0025: Peripheral Reflex System (PRS)v1.089/9/2021
- AN0026.0: EFM32 and EZR32 Wireless MCU Series 0 Low Energy Timerv1.098/17/2020
- AN0027: Energy Optimizationv1.039/9/2021
- AN0028: Low Energy Sensor Interface - Capacitive Sensev2.109/9/2021
- AN0029: Low Energy Sensor Interface - Inductive Sensev1.069/9/2021
- AN0032: Ethernetv1.089/9/2021
- AN0033: AES Cipher Modes with EFM32v1.119/9/2021
- AN0036: Low Energy Sensor Interface - Resistive Sensev1.069/9/2021
- AN0039: Interrupt Handlingv1.049/9/2021
- AN0042: USB/UART Bootloaderv1.229/9/2021
- AN0045: USART/UART - Asynchronous Modev1.039/9/2021
- AN0053: IR Sensor Monitoring Using LESENSEv1.039/9/2021
- AN0054: Connect the EFM32 with a Smart Phone through the Audio Jackv1.049/10/2021
- AN0059.0: UART Flow Controlv1.047/23/2020
- AN0065: EFM32 as USB Devicev1.039/9/2021
- AN0816: EFM32 Brushless DC Motor Controlv1.19/10/2021
- AN1112: Helix MP3 Decoder on Series 1 EFM32 MCU Devices9/3/2020
- AN1188: EFP01 Coulomb Countingv1.18/12/2020
- UM004: Lesson 4 - EFM32 Interrupts and DMA Example Codev19/9/2021
- UM005: Lesson 5 - EFM32 Peripherals Example Codev19/9/2021
- UM006: Lesson 6 - EFM32 Energy Modes Example Codev19/9/2021
- UM007: Lesson 7 - EFM32 Energy Optimization Example Codev19/9/2021
- Si446x RX_HOP PLL Calculatorv1.02/4/2020
- Wireless M-Bus Softwarev1.0.3-22/6/2020
- Simplicity Commander -- Linuxv1.12.13/5/2025
- Simplicity Commander -- Linuxv1.12.111/12/2024
- Simplicity Commander -- Macv1.12.111/12/2024
- Simplicity Commander -- Macv1.12.13/5/2025
- Simplicity Commander -- Windowsv1.12.13/5/2025
- Simplicity Commander -- Windowsv1.12.111/12/2024
- SimplicityCommander-ReleaseNotes.txtv1.12.111/12/2024
- SimplicityCommander-ReleaseNotes.txtv1.12.13/5/2025
- EFM32/EFR32/EZR32 Gecko Software Development Kit HTML Documentationv5.0.08/13/2020
- EFM32/EFR32/EZR32 Gecko Software Development Kitv5.0.09/9/2021
- RF Range Calculator5/15/2020
QUALITY & PACKAGING
Quality Assurance, Environmental and Packaging Information
The longevity date shown above is for the preferred revision of this part number, for a complete list of part number revisions, use the search button below.
As part of its ongoing commitment to supply continuity, Silicon Labs may provide pin-compatible and functionally equivalent replacement products if Silicon Labs determines, at its discretion, that supply chain adjustments, product improvements, market conditions, or similar business or technical issues make this necessary or advisable.
If for business, technical or other reasons beyond Silicon Labs’ reasonable control, Silicon Labs finds that it is necessary to discontinue a product, our policy is to issue an EOL notice that provides 6 months from notice to place final orders and 12 months from notice for final shipments. This policy complies with the JEDEC standard EIA/JESD48 that is commonly used in the semiconductor industry. We provide the required support for a product for its full life cycle.

Find and download additional quality, environmental, device composition, test results, shipping and supply chain information for Silicon Labs devices.
Search results will include:
- Product Information
- Packing Information
- Quality System Certifications
- Financial Information
- Conflict Minerals (CMRT)
- Environmental Information
- RoHS Certificate of Compliance
- REACH Declaration
- Detailed Device Composition (MDDS)
- MCD/FMD
- RoHS Certificate of Compliance
- Qualification Data
- Trade Compliance: ECC/HTS Codes
- Supply Chain Information
- IPC 1752-2 Class 6 (XML format)
- ICP Test Reports
- Halogen-Free Certificate of Compliance
- PFOS/PFOA Certificate of Compliance
- Supply Assurance Letter (Longevity)
COMMUNITY & SUPPORT
RFSense on EFR32xG22
RFSense is a low power feature of the EFR32 Wireless MCU family. It can "wake up" an MCU from its EM2 or even EM4 power modes. Practically, it is an ultra low power interrupt source, running on ULFRCO clock.
The RFSense is a wide band circuit, it can detect energy in the 100MHz - 5 GHz frequency range, filtered only by the matching network of the RF front end. This is an advantage, as no need for separate PCB components. But it’s also a drawback: it is sensitive to any kind of interferer signal as well.
EFR32xG22 has an updated RFSense module, which improves the performance compared to EFR32 Series 1 in multiple ways:
- RFSense works below 0C degree
- RFSense works if voltage is scaled down
- Introduces Selective mode
Legacy mode
In legacy mode, EFR32xG22 RFSense is fully compatible with the one in Series 1. This means that if the RFSense module detected energy for a configured time, it generates an interrupt.
Selective mode
Selective mode mitigates the unfiltered nature of RFSense. Instead of simply detecting energy for a given time period, it detects "a pattern of energy", which is essentially an OOK packet. The packet is Manchester coded, uses fixed 1kbps bitrate, 1B preamble and 1-4B sync word (no payload added). This packet can be transmitted by any OOK capable device, including all EFR32 wireless MCUs (Series 1 and Series 2).
Selective mode offers 2 configuration options to select from: "optimized for sensitivity" or "optimized for noisy environment".
The Wakeup Packet
The wakeup packet is a fixed-configuration OOK packet with the following settings:
- Starts with a 1 B preamble (always 0x55).
- Followed by a 1-4 B sync word.
- No payload required.
- Both the preamble and sync word are transmitted LSB first.
- 1 kbps bitrate (before coding).
- Recommended carrier is 2.45 GHz.
Selective Mode Transmit Example Without Using API
You can find an example application here, that demonstrates how to transmit wakeup packets without using the RAIL API, for improved range. It can be used on EFR32xG22 and EFR32xG28 devices.
Assume you select 0xb16e as your sync word, and you want to transmit it with only a signal generator (or a simple radio with MSB-first byte handling and no Manchester coder).
First, flip the endianness of both preamble and sync word: 0x55 becomes 0xaa and 0xb16e becomes 0x768d.
The full packet is then 0xaa768d, which after Manchester coding becomes 0x99996a6995a6.
Configuring this encoded packet and transmitting on 2.45 GHz with high enough TX power should wake up a device configured for selective RF Sense with the 0xb16e sync word
For more details on selective mode, see AN1244: EFR32 migration guide for Proprietary applications
[studio4] RAIL Tutorial 4: Combining Transmit and Receive
Outdate notice
This article was written for Simplicity Studio 4 and GSDK 2, and kept public for those who still need information on it. For the current, recommended version of this article go to https://docs.silabs.com/rail/latest/rail-training-trx/.
All the articles can be found on the DSC table of content page.
---
This tutorial builds on the following tutorials:
- RAIL Tutorial 1: Introduction and init
- RAIL Tutorial 2: Transmitting a Packet
- RAIL Tutorial 3: Event Handling
Please read them first if you haven't.
You can find other tutorials on the table of contents site.
In this tutorial, we're going to combine what we had from the previous tutorial. We're going to switch between transmit and receive, and we're going to use a few peripherals on the WSTK as a user interface.
Our goal is to transmit a predefined packet when either of the buttons are pressed, and print the packet to the serial console when received. We're also going to toggle LEDs on finished Rx/Tx, but we ignore errors.
You can find a SimpleTRX example in Simplicity Studio, which has similar purpose. However, the result of this tutorial will be somewhat different.
Preparations
We're going to start from the usual, the Simple RAIL with HAL example. However, we'll need some modifications in the Hardware Configurator because we'll need the UART bridge and buttons, which are not enabled by default. To do that, enable the following defaultMode peripheral modules:
- Virtual COM Port
- Button
Next, we'll have to include a few things to have these peripherals, and while some of the peripherals are automatically initialized, not all, so we're going to do that in a function:
#include "bsp.h"
#include "retargetserial.h"
#include "gpiointerrupt.h"
#include <stdio.h>

typedef struct ButtonArray{
  GPIO_Port_TypeDef   port;
  unsigned int        pin;
} ButtonArray_t;

static const ButtonArray_t buttonArray[BSP_BUTTON_COUNT] = BSP_BUTTON_INIT;

void gpioCallback(uint8_t pin);

void peripheralInit(){
  RETARGET_SerialCrLf(1); //converts \n to \r\n
  //set up button GPIOs to input with pullups
  for ( int i= 0; i < BSP_BUTTON_COUNT; i++){
    GPIO_PinModeSet(buttonArray[i].port, buttonArray[i].pin, gpioModeInputPull, 1);
  }
  //set up interrupt based callback function on falling edge
  GPIOINT_Init();
  GPIOINT_CallbackRegister(buttonArray[0].pin, gpioCallback);
  GPIOINT_CallbackRegister(buttonArray[1].pin, gpioCallback);
  GPIO_IntConfig(buttonArray[0].port, buttonArray[0].pin, false, true, true);
  GPIO_IntConfig(buttonArray[1].port, buttonArray[1].pin, false, true, true);
}
As you see, gpioCallback() will be called on button press.
Radio init
By default, after receiving or transmitting a packet, RAIL will switch to idle mode (i.e., turn off the radio). Since we want it to keep receiving future packets, we can use RAIL's auto state transition feature with the RAIL_SetRxTransitions and RAIL_SetTxTransitions APIs.
RAIL_StateTransitions_t transitions = {RAIL_RF_STATE_RX, RAIL_RF_STATE_RX};
RAIL_SetRxTransitions(railHandle, &transitions);
RAIL_SetTxTransitions(railHandle, &transitions);

RAIL_ConfigEvents(railHandle, RAIL_EVENTS_ALL, RAIL_EVENTS_TX_COMPLETION | RAIL_EVENTS_RX_COMPLETION | RAIL_EVENT_CAL_NEEDED);
We're basically saying, after the packets are received/transmitted, we want to return to Rx. We're also enabling some events as we've seen before. The only new one is RAIL_EVENT_CAL_NEEDED - it will have it's own tutorial; for now, it is important to know that it should always be implemented to have the maximum available performance.
Basic Rx and Tx Combined
#define PAYLOAD_LENGTH 16
#define BUFFER_LENGTH 64
static uint8_t payload[BUFFER_LENGTH] = {PAYLOAD_LENGTH-1, 0x01, 0x02, 0x03, 0x04, 0x05, 0x06, 0x07, 0x08, 0x09, 0x0a, 0x0b, 0x0c, 0x0d, 0x0e, 0x0f};
volatile bool startTx = false;

void gpioCallback(uint8_t pin){
  startTx = true;
}

int main(void)
{
  CHIP_Init();
  initRadio();
  peripheralInit();
  RAIL_StartRx(railHandle, 0, NULL);

  while (1){
    if ( startTx ){
      RAIL_SetTxFifo(railHandle, payload, PAYLOAD_LENGTH, BUFFER_LENGTH);
      if ( RAIL_StartTx(railHandle, 0, RAIL_TX_OPTIONS_DEFAULT, NULL) == RAIL_STATUS_NO_ERROR ){
        startTx = false;
      }
    }
  }
  return 0;
}

void RAILCb_Generic(RAIL_Handle_t railHandle, RAIL_Events_t events)
{
  if( events & RAIL_EVENT_CAL_NEEDED ){
    RAIL_Calibrate(railHandle, NULL, RAIL_CAL_ALL_PENDING);
  }
  if ( events & RAIL_EVENTS_TX_COMPLETION ){
    BSP_LedToggle(0);
  }
  if ( events & RAIL_EVENTS_RX_COMPLETION ){
    BSP_LedToggle(1);
  }
}
There's not much new here. We start by initializing everything then going to Rx mode. When a button is pressed startTx will be true, which will start transmitting a packet (changing from Rx to Tx mode). Note that the variable startTx is volatile, because it's changing in interrupt context. If you're unfamiliar with this practice, look it up; it's very important for low-level embedded applications.
In the event handler, we blink LEDs on Rx/Tx completion. In the CAL_NEEDED handler we're basically saying: If any calibration is needed, run it. Again, this is important to get the maximum available performance, but we won't go into details for now.
At this point, you should see LEDs blinking on both devices when you press a button on either of them. So at this point, we added a single concept: we return to Rx state both after receiving a packet, and after transmitting one. This enabled a combined Rx/Tx application. However, there's one important thing we didn't do so far: we did not download the received packet.
Downloading the Packet
Receive FIFO
We already configured Tx FIFO multiple ways. RAIL also implements an Rx FIFO. By default, it's 512B, allocated by the RAIL library. We will use that, but it is configurable. See RAILCb_SetupRxFifo() and RAIL_SetRxFifo() in the API documentation for details.
By default, you cannot use the whole 512B, as RAIL adds a few bytes to each packet to store timestamp, RSSI and similar information in the FIFO (sometimes we call this "appended info").
We're working on what we call packet mode. It's the simpler, and recommended way, but it's not possible to handle packets bigger than 512B with this method,; in which case FIFO mode should be used. We return to that topic in a later tutorial.
The Packet Handler
The FIFO is accessible with RAIL_RxPacketHandle_t variables or packet handles. Obviously, we don't have the handle of the packet we just received, but we have "sentinel" handles:
- RAIL_RX_PACKET_HANDLE_OLDEST
- RAIL_RX_PACKET_HANDLE_NEWEST
- RAIL_RX_PACKET_HANDLE_INVALID
The names are self-explanatory.
When to Read the FIFO
Let's say we want to download the packet when it's fully received (although it's possible to access it during reception). We must let RAIL know this in the event RAIL_EVENT_RX_PACKET_RECEIVED. If we don't, RAIL automatically frees the memory allocated to the packet we just received.
We have two options:
- Download the packet from the event handler
- Hold the packet in the FIFO and download later
While the first one is simpler, we also want to print the message on UART, which takes a long time, and that's not a good idea in interrupt context, so we'll use the second one.
To do that, let's create a volatile packetHandle, with invalid value:
volatile RAIL_RxPacketHandle_t packetHandle = RAIL_RX_PACKET_HANDLE_INVALID;
static uint8_t rxBuffer[BUFFER_LENGTH];
We should only write the handle if it's invalid, otherwise we might lose the handle to a locked packet (and essentially lose part of the receive buffer). We'll also need a buffer to copy the packet before printing it.
The Event Handler
Let's implement the event handler so it will only store packets if packetHandle is invalid:
if ( events & RAIL_EVENTS_RX_COMPLETION ){
  BSP_LedToggle(1);
  if ( (events & RAIL_EVENT_RX_PACKET_RECEIVED) &&  packetHandle == RAIL_RX_PACKET_HANDLE_INVALID ){
    packetHandle = RAIL_HoldRxPacket(railHandle);
  }
}
The API RAIL_HoldRxPacket will lock the packet we just received (or receiving) and return its handle.
Download and Print
In the while loop, if there's something in the handle, let's download and print it:
if ( packetHandle != RAIL_RX_PACKET_HANDLE_INVALID ){
  RAIL_RxPacketInfo_t packetInfo;
  RAIL_RxPacketDetails_t packetDetails;
  RAIL_GetRxPacketInfo(railHandle, packetHandle, &packetInfo);
  RAIL_CopyRxPacket(rxBuffer, &packetInfo);
  RAIL_GetRxPacketDetails(railHandle, packetHandle, &packetDetails);
  RAIL_ReleaseRxPacket(railHandle, packetHandle);
  packetHandle = RAIL_RX_PACKET_HANDLE_INVALID;

  printf("RX");
  for(int i=0; i < packetInfo.packetBytes; i++){
    printf(" 0x%02X", rxBuffer[i]);
  }
  printf("; RSSI=%d dBm\n", packetDetails.rssi);
}
Let's go through this, line by line:
First, RAIL_GetRxPacketInfo will return with packetInfo, which has the length of the received packet, and pointers to download it. Note that unlike transmit, this is independent of the length coding method (fixed or variable) we used in the Configurator.
Since the receive buffer is a ring buffer, the download will be always the same 3 lines of code, which is done in the RAIL_CopyRxPacket inline function.
The API RAIL_GetRxPacketDetails will return some useful information of the packet, such as RSSI.
Finally, we release the packet, and set the handle to invalid, so the event handle can write it.
Download in the Event Handle
Downloading the packet in the event handler is essentially the same as what we did in the main loop above:
if (events & RAIL_EVENT_RX_PACKET_RECEIVED) {
  RAIL_RxPacketInfo_t packetInfo;
  RAIL_GetRxPacketInfo(railHandle, RAIL_RX_PACKET_HANDLE_NEWEST, &packetInfo);
  RAIL_CopyRxPacket(rxBuffer, &packetInfo);
  RAIL_GetRxPacketDetails(railHandle, packetHandle, &packetDetails);
}
Note that packetDetails should be a global variable as well in this case.
Conclusion
With this, you can use RAIL for basic transmit and receive, which concludes the getting started series. However, RAIL can do much more - you can continue with the basic tutorials from the table of contents site.
API Introduced in this Tutorial
Functions
- RAIL_SetRxTransitions()
- RAIL_SetTxTransitions()
- RAILCb_SetupRxFifo()
- RAIL_SetRxFifo()
- RAIL_HoldRxPacket()
- RAIL_ReleaseRxPacket()
- RAIL_GetRxPacketInfo()
- RAIL_GetRxPacketDetails()
- RAIL_CopyRxPacket()
Types and enums
[studio4] RAIL Tutorial 2: Transmitting a Packet
Outdate notice
This article was written for Simplicity Studio 4 and GSDK 2, and kept public for those who still need information on it. For the current, recommended version of this article go to https://docs.silabs.com/rail/latest/rail-training-tx/.
All the articles can be found on the DSC table of content page.
---
This tutorial builds on the following tutorial/s:
Please read them first if you haven't.
You can find other tutorials on the Table of Contents site.
In this tutorial, we’re going to modify the project Simple RAIL with HAL to transmit a packet. Let’s use the default, fixed length 16Byte payload configuration first (assuming you are familiar with using RAIL Test sample application in Flex SDK).
Buffer Handling
Setting Up the Packet Buffer
RAIL requires a buffer (usually called FIFO) to be configured for Tx (this is slightly different from RAIL 1.x, where the library initialized that buffer automatically). First, we have to allocate some memory for that buffer:
#define BUFFER_LENGTH 256
static uint8_t txBuffer[BUFFER_LENGTH];
Note that you can’t use any arbitrary size:; EFR32 creates a FIFO ring buffer on this memory area, and it can only handle buffer sizes of a power of 2 between 64 and 4096 (i.e., 64, 128, 256, 512, 1024, 2048, or 4096).
To load the payload of the packet to the buffer, we have two options: write it via RAIL APIs or write to the memory directly.
Writing to the Buffer Directly
#define PAYLOAD_LENGTH 16
#define BUFFER_LENGTH 256
static const uint8_t payload[PAYLOAD_LENGTH] = {0x00, 0x01, 0x02, 0x03, 0x04, 0x05, 0x06, 0x07, 0x08, 0x09, 0x0a, 0x0b, 0x0c, 0x0d, 0x0e, 0x0f};

static uint8_t txBuffer[BUFFER_LENGTH];

void loadPayloadDirectly(){
  memcpy(txBuffer, payload, PAYLOAD_LENGTH);
  RAIL_SetTxFifo(railHandle, txBuffer, PAYLOAD_LENGTH, BUFFER_LENGTH);
}
The memcpy is just a standard C instruction to write to buffers, and we use RAIL_SetTxFifo to pass that buffer to RAIL. We also tell RAIL how long the buffer is, and how much data it has already in it.
Writing to the Buffer Indirectly
#define PAYLOAD_LENGTH 16
#define BUFFER_LENGTH 256
static const uint8_t payload[PAYLOAD_LENGTH] = {0x00, 0x01, 0x02, 0x03, 0x04, 0x05, 0x06, 0x07, 0x08, 0x09, 0x0a, 0x0b, 0x0c, 0x0d, 0x0e, 0x0F};

static uint8_t txBuffer[BUFFER_LENGTH];

void initRadio(){
  //...
  RAIL_SetTxFifo(railHandle, txBuffer, 0, BUFFER_LENGTH);
}

void loadPayloadIndirectly(){
  RAIL_WriteTxFifo(railHandle, payload, PAYLOAD_LENGTH, false);
}
In this case, we pass the buffer to RAIL when it’s still empty, and we write to that buffer using a RAIL API. Note that using memcpy instead of WriteTxFifo would not work: while it would write the memory itself, it wouldn’t change the read and write pointers of the FIFO, handled by RAIL, so RAIL would still think the buffer is empty.
Direct or Indirect
There are two main factors that could decide which method to use to write the FIFO:
- With indirect mode, the buffer can be used for partial packets and simpler to use for multiple packets.
- Calling
RAIL_SetTxFifodoes not move any memory, just sets a few register, while callingRAIL_WriteTxFifodoes need some time to copy the payload to the buffer.
So in most cases, RAIL_SetTxFifo is better and simpler. If you want to send the same packet over and over (or only change a few bytes in it), it’s much better, since you don’t have to write the whole packet again.
On the other hand, if you want to send longer packets than your buffer, you must use RAIL_WriteTxFifo. It’s also useful if you want to send out a lot of packets (e.g., a segmented message, or a single WriteTxFifo for each packet).
FIFO Reset
The last parameter of RAIL_WriteTxFifo can reset the FIFO, which means it will invalidate the data already in there. This is also possible with RAIL_ResetFifo. I would generally recommend not to use it, a well-written code shouldn’t need it (as it should only store in the FIFO what should be sent out), and it takes extra time.
Transmitting the packet
Starting the transmission is very simple:
RAIL_StartTx(railHandle, 0, RAIL_TX_OPTIONS_DEFAULT, NULL);This instructs RAIL to start transmitting the data stored in the FIFO on channel 0 (second parameter). The third parameter can change various options, like using the second configured sync word (see RAIL API reference). The last parameter is only required for DMP (dynamic multiprotocol) mode.
Changing the Packet Length
You can change the configured fixed length on the Radio Configurator, but that’s obviously not possible at runtime, which is often needed. Note that the amount of data loaded into the FIFO does not matter as long as it’s equal to or greater than the length of the frame.
Changing Packet Length with a Fixed Length Configuration
With the API RAIL_SetFixedLength(), it’s possible to change the pre-configured length (stored in rail_config.c) at runtime. Note that this changes the length of the packets on the Rx side as well. If you want to return to the pre-configured value, you can use RAIL_SetFixedLength(railHandle, RAIL_SETFIXEDLENGTH_INVALID).
Using Variable Length Configurations
A lot of protocols store the length of the packet in the header of the frame. For example, in 802.15.4, the first byte stores the length (and the maximum is 127). To set this up, use the following settings in the Radio Configurator:
- Set Frame Length Algorithm to VARIABLE_LENGTH
- Enable the Header
- Set the length of the header to 1, and enable CRC over it
- Set variable length bit size to 8
- Set the maximum length to 127
For more information on this setup, and on more advanced variable length configs, see AN971.
With this setup, the radio will always be in variable length mode. This means that:
- During Rx, RAIL decodes the length field and set up the frame accordingly. Invalid length frames will be dropped
- During Tx, RAIL does the same
RAIL_SetFixedLength()is not available
This means that during Tx, we have to make sure that the committed length in the header matches the amount of bytes you load into the FIFO. It also means that if we set the length field to more than 127, we will get a transmit error.
This would be a valid, 16B frame:
static const uint8_t payload[PAYLOAD_LENGTH] = {PAYLOAD_LENGTH-1, 0x01, 0x02, 0x03, 0x04, 0x05, 0x06, 0x07, 0x08, 0x09, 0x0a, 0x0b, 0x0c, 0x0d, 0x0e, 0x0F};We use PAYLOAD_LENGTH-1 in the length field since the 1B length field itself shouldn't be counted.
Conclusion
We didn't care about possible errors generated by RAIL: we do that next time, which also provides hints for receiving packets.
API Introduced in this Tutorial
Functions
- RAIL_SetTxFifo()
- RAIL_WriteTxFifo()
- RAIL_StartTx()
- RAIL_SetFixedLength()
Questions? You're in the Right Place.
Silicon Labs has an active, knowledgeable user community of engineers and developers that are enthusiastic about solving problems.
Browse the Community